Welcome back, my fellow googlers, programmers, and amigos! Today we're going to talk about autolayout. A confusing system for many but I believe after this tutorial you are going to feel confident in constraining even your most complicated app layouts!

Basic Overview
- Autolayout is a layout system that allows the programmer to set a series of constraints on elements of the view. These constraints define an element's size and location within the superview and manage how these properties will adjust to changing superview size and/or orientation.
- All subviews require at least x and y constraints - that is, constraints that define where the view should appear horizontally and vertically within the superview.
- Most views also require width and height constraints that tell the device how large to make the sub views and how those sizes should or should not change depending on screen size and orientation.
Simple Examples
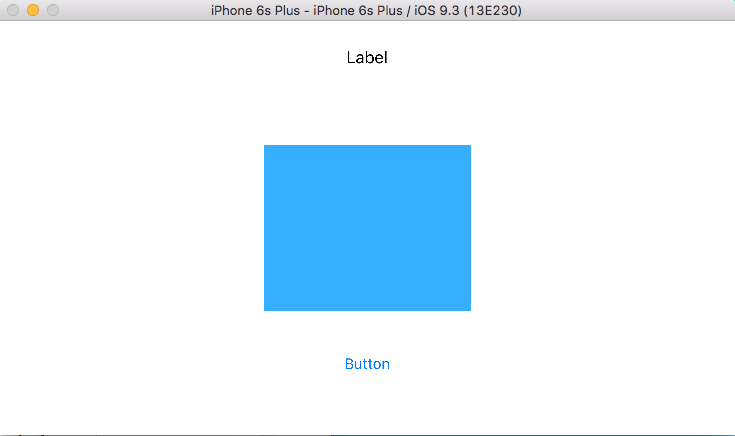
- We'll start with a simple single-layout app. In the storyboard we see a large white box that represents the ViewController's view (the superview). We can drag various elements into this ViewController's view from the Object Library on the right. I'm going to drag in a Label, an Image View, and a Button.

- Now out of these three view types, only the Image View actually needs all four constraints. In other words, the label and the button do not need width and height constraints. They only require x and y constraints. That's because these views will adjust to the content that they contain. If a label has a 10-letter word in it, the label will be big enough to show the text by default. This is something you can choose to change depending on the view you're trying to achieve.
- The first thing you want to do is either draw or wireframe what you'd like your view to look like. Then re-draw in landscape view. Imagine the user interacting with the app. Is one view more important than the other? Will everything fit if the device rotates. How should they grow/shrink? These questions will help guide your autolayout experience.

- I want all three of my views to be horizontally constrained at the center. I want my image to also be vertically constrained to the center. Then I want the label to be a certain distance away from the image on top and the button to be a certain distance away from the image on the bottom. When the device turns, the image will have to get a little smaller. The label and the button can stay the same.
- The easiest way to constrain the views to the horizontal axes is to drag them until we see the blue dotted line running down the center of the superview. In this case, the superview is the View Controller's view.

- Now that all of my sub views are on that dotted blue line in the middle I'm going to constrain them to this location. Click on each subview individually and select the "Align" menu on the bottom of the page. Click "Horizontally in container" and then click "Apply 1 constraint." Now our view will always be aligned to the superview's center x.

- You will notice that even after we constrain all three views to the horizontal center (x) that there are red lines on the screen. These lines mean different things depending on their color.
- Red means that not all of the constraint requirements are met. You can fix this by adding the missing constraints.

- Orange means that all of the constraints are there but the placement of the view doesn't match what you defined in the constraint. You can fix that by either updating the frame so the view moves to where the constraint says it should be or by updating the constraints to change their definition so that where the view is currently located is correct.
- If you see blue lines then you're good to go! All constraints that are needed are there and they match the views' placements in the superview.
- In this case, we know we have red lines because we haven't defined the (y) vertical placement constraints for any of our objects. We'll start this off by clicking the image view and constraining it to the vertical center. Do this the same way that you constrained the horizontal centers.

- You'll notice that now even though we have the x and y defined for the image that it's lines are still red. That's because images need width and height constraints as well.
- In some cases, it's best to constrain the image to a set size. You can do this by clicking on the image and then on the Pin menu on the bottom. You can adjust the width and height and then constrain them to be constant (never changing).
- In this case, however, we want the image to shrink when we rotate the device and grow when it's back in portrait so we don't want a constant size. We achieve this affect with Aspect Ratio.
Aspect Ratio
- Aspect ratios are extremely helpful in setting your size constraints. What they do is set the size of one item in relation to another. So if you set the width of an image in aspect ratio to the width of its superview then as the superview width grows, the image width will grow. You can do the same for the height as well.
- In the case of this app we actually need to think this through a bit. It's true that when the device rotates from portrait to landscape that the width of the superview is wider, however, the height of the superview is actually smaller. Since our views are laid out one on top of the other and not side by side, we actually need to shrink the image when it rotates to landscape.
- To do this, we're going to set the aspect ratio of the image's height to the superview's height and then instead of doing the same for the width we're actually going to set the aspect ratio to itself.
- Let's take this one at a time, first click on the image. Then hit the control key and drag it to the superview. A little box will pop-up with options. You are going to select "Aspect Ratio."

- Now for some reason when you do this it will set the image width to the superview height which doesn't make sense for our purposes. We need to alter this constraint.
- On the left-hand side of the screen you'll see the Document Outline. This lists all of the views and subviews in the scene. Select the image from this menu by simply clicking on it. Then on the right-hand side of the screen look at the Utilities menu. There are six icons at the top. Click on the second to last one that looks like a ruler. This is called the Size Inspector. Here you will see all of the constraints that are currently set on that view. So in this case, we see the x and y constraints along with the ratio constraint we just set.
- Double-click on the ratio constraint. When you do this, it will open up so you can view the current constraint details and alter them if you like. At the top change the constraints to read Image View.height relation Equal to Superview.Height.
- The wording here may seem confusing. It seems like we're setting the height of the image equal to the height of the superview which would be much too large. But if we look below that area we see some more options. In particular, I want you to look at the multiplier. Right now mine is set as 2:5. Which means that the image view's height is slightly less than half the superview's height. I can change this ratio as I please. I want to change it to 3:5 so that my image is slightly bigger than half the superview's height.


- You won't see any big change except that the orange number line next to the image view changes. This tells us that the current view's measurements do not match the constraint we just set. To fix this we would normally update the frame but because we haven't yet set the width constraint that might make our view look a little crazy. Let's do that first.
- Setting the width constraint on itself is similar to setting it on another view. Control click on the image View and drag it in one direction within the same image View. Do not drag it outside of the frame of that image. You will see a similar box as before. Select Aspect Ratio.

- In the Size Inspector on the right you should see a new constraint appear. Double click on it. Here we see that the image view's width is set Equal to its height. Again, this doesn't mean what it seems which we can tell by the multiplier on the bottom. Mine is currently 15:8 which I will leave for now.
- Notice that the lines in the view are now blue with the exception of the height constraint that is orange. We know that this is because we updated the ratio but in case you didn't know let me show you how to figure it out.


Structure Menu
- Back in your document outline on the left, you'll notice that there's a little red arrow at the top. (This will sometimes be orange also, depending on the issues in the view). Click on the arrow to reveal the structure menu. Here we see that there are missing constraints for the button and the label (which we already know because we haven't set their (y) vertical placement yet.)


- Under misplaced views we also see a listing for the image view. Click on the yellow warning sign. Four choices appear. The two most important choices are:

- Update frames - this means that you think the constraint is correct but the view is not matching what you want it to look like. When you click this button it will adjust what the view looks like to match your set constraints.
- Update constraints - this means that you think the view looks right but the constraints are wrong. When you click this button it will keep the view as is and just adjust the constraints that are conflicting.
- We are going to choose update frame. Then choose fix misplacement. Our image is now humongous so we know that I made it a little too big. Let's go back to the constraint and adjust the ratio until it looks the way we want it. A shortcut to adjusting the frame (rather than using the structure menu) is to click on the "Resolve Autolayout Issues" button on the bottom right.

- Be careful here! There are options to update the selected view but there's also an option to update all views. Make sure you click the one you want. In this case, we're just going to update the selected view.
- Looking pretty good but I know I still have to set the y constraints for the label and the button. Let's do the label first. There are a few ways we could constrain this. We could make it a set distance away from the top of the view. Then no matter what size or layout of the device it would be that distance away from the top. Let's think this through, though. If we do that and the height of the view shrinks, like when rotating to landscape view, the label may overlap the image.
- A better option in this case is to constrain it as a set distance from the image. Control click on the label and drag it to the image. That box will pop up and you should choose "Vertical Spacing." Notice that the line is now blue and the missing constraint for that view went away in the structure menu. This view is done!


- Now let's do the same thing for the button view. Control click and drag to the image. Again, choose "Vertical Spacing." No more constraint issues! Blue lines for everyone! Hooray!

- Now if we were to look at the constraints listed for every item on the page we'd see that the label and button each have two constraints: horizontal center with superview and vertical spacing to image view.
- Our image view, however has way more. Why is that? Well we have the one for the vertical centering and one for the horizontal centering. But we also set width and height constraints. It's height is constrained to a ratio of the superview and its width is constrained to the ratio of its height. So that's another two constraints that the label and button don't have. The last two are actually the label and the button constraining to it. So like I said, most views only need two, some need four but you could have more than that depending on how your views are constrained to one another.
Testing the View
- I want to run this view in the simulator but first, because we didn't actually put an image in this project, we can either drag an image in and change the image in the attributes inspector or we can simply give the image a background color that shows when no image is loaded. Let's do that instead, to keep things easy. In the attributes inspector choose a background color then choose a device up top and run.

- We see that in portrait our image is pretty huge. It looks like it takes up at least the width of the superview, if not more. Now rotate the device by clicking Hardware up top in the file menu and choose rotate left. This actually looks nice! So we need to update things a little. Let's go back to our storyboard.


- Let's update our width constraint so that the image isn't quite so wide. Under the image's constraints, select ratio to image view. Right now, mine is 15:8. Let's lower that front number a bit and see what we get. I'm going to go with 10. now when we run the app again we see that the width fits within the frame and when you rotate it, it looks great too. Now of course if you had an image that needed to be sized differently (wider than it is tall) you'd have to also update your height constraints accordingly. But for our purposes this looks good.

- Now, rather than running the app in different simulators there is a little trick to see how it will look on different devices. Click on the Assistant Editor at the top of the screen (looks like overlapping circles).

- Close all of the other menus so that you can see more of the two screens. In the right screen, towards the top, click on where it says "Automatic" and instead choose "Preview." This will show you a preview of what the app will look like in a device. There's a plus sign on the bottom. If you click that you can look at other devices too.


That's it!
So now you're an autolayout pro! And if not, checkout this Standford Lecture on YouTube about autolayout. This was really helpful for me when I was first learning. Keep practicing with different views and explore all of the tools that are available to help you. And tune in next week to learn about the cosmic power of stack views and how they make your autolayout life so much easier!
No comments:
Post a Comment